![How to Initialize Hard Drive | Disk Unknown Not Initialized Unallocated [FIX]](https://techeasyreview.com/wp-content/uploads/2024/10/maxresdefault-1-768x432.jpg)
One of the most frustrating moments for a PC user is when an external hard drive doesn’t show up as expected. You plug it in, ready to access your files, but instead, your drive isn’t showing up in File Explorer. When you check Disk Management, it appears with the status “Not Initialized” and “Unallocated.” If you’re facing this issue, you’re likely worried about data loss, and rightly so. This article will guide you through various methods to fix this issue without losing any data.
Why Does My External Hard Drive Show “Not Initialized” and “Unallocated”?
Before diving into solutions, it’s essential to understand why this happens. The “Not Initialized” and “Unallocated” status typically indicates a problem with the hard drive’s partitioning or file system. Common reasons include:
- Corrupted Partition Table: The partition table holds information about how data is organized on your disk. If it becomes corrupted, Windows won’t recognize the drive.
- Outdated or Missing Drivers: Sometimes, the hard drive is in perfect working condition, but Windows doesn’t have the necessary drivers to read it.
- Physical Damage: If the drive has been dropped or suffered mechanical damage, it may be unrecognizable by Windows.
- Virus/Malware: Malware can corrupt system files, including partition information, making the drive unrecognized.
- File System Corruption: The file system (NTFS, FAT32, etc.) might be damaged due to improper shutdowns, power outages, or virus attacks.
Regardless of the reason, your main goal is to fix the drive without losing your precious data. Here’s a step-by-step guide to achieving that.
Step 1: Check Basic Connectivity and Troubleshooting
Before jumping into more technical solutions, it’s important to rule out basic issues that might prevent your drive from showing up:
1.1 Try a Different USB Port or Cable
Sometimes, the issue might be as simple as a faulty USB port or cable. Try connecting your external hard drive to a different USB port or use another cable. If it works, the problem lies with the initial port or cable.
1.2 Check for Drive Detection in BIOS
Ensure that your PC is detecting the external hard drive at a hardware level. Restart your computer and enter the BIOS/UEFI settings. Check if the external hard drive is listed there. If it’s detected in BIOS but not in Windows, you can be more confident that it’s a software issue rather than a hardware failure.
Step 2: Use Device Manager to Update or Reinstall Drivers
Outdated or corrupted drivers can cause Windows not to recognize your external hard drive. To fix this:
2.1 Update the Driver
- Press
Win + Xand choose Device Manager from the menu. - Expand the Disk Drives section.
- Locate your external hard drive (it may be listed as “Unknown device”).
- Right-click it and select Update driver.
- Choose Search automatically for updated driver software.
Once the drivers are updated, restart your computer and check if the external hard drive shows up correctly.
2.2 Uninstall and Reinstall the Device
If updating the driver doesn’t work, try uninstalling and reinstalling it:
- In Device Manager, right-click your external drive and choose Uninstall device.
- After uninstallation, disconnect the external hard drive and restart your computer.
- Reconnect the drive, and Windows should reinstall the necessary drivers automatically.
If the problem persists, move on to the next step.
Step 3: Initialize the Disk in Disk Management Without Data Loss
When a drive is listed as “Not Initialized” in Disk Management, you may be prompted to initialize it. Initializing a disk prepares it for use by Windows, but doing so will format the drive, which can erase all data.
However, you can initialize the disk safely and recover the lost partition afterward. Here’s how:
3.1 Initialize the Disk
- Press
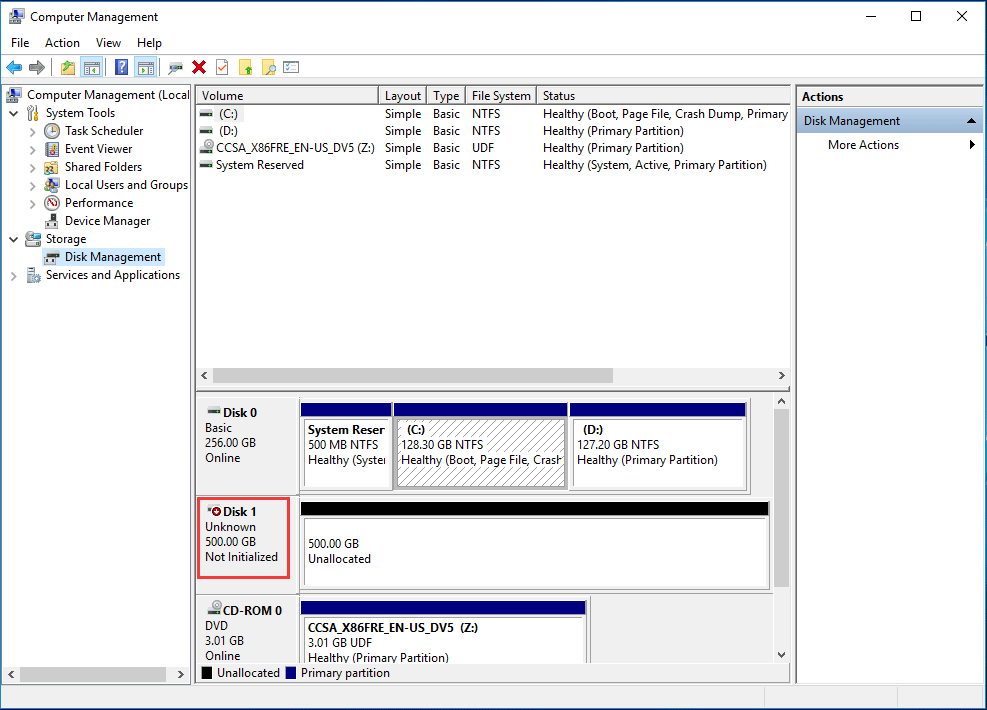
Win + Xand choose Disk Management. - Find your external hard drive in the lower section. It will be listed as Unknown and Not Initialized.
- Right-click on the disk and choose Initialize Disk.
- Select MBR (Master Boot Record) or GPT (GUID Partition Table). (MBR is older and compatible with more systems, while GPT supports larger drives over 2TB.)
- Click OK.
Note: Initializing a disk will make it available for further steps, but it can erase data if you’re not careful. Do NOT proceed with partitioning or formatting the drive yet.
3.2 Use Data Recovery Software
Since initializing the disk might wipe your partition table, the next step is to recover the lost data before proceeding with any further partition or format operations. Here’s how to do it using data recovery software:
3.2.1 Recommended Data Recovery Tools
There are many reputable tools available for recovering data from external hard drives, such as:
- Stellar Data Recovery: A reliable solution for recovering lost data after initialization.
- EaseUS Data Recovery Wizard: Known for its simplicity and high success rate.
- Recuva: A free tool with decent functionality for basic recovery.
- MiniTool Power Data Recovery: Another powerful solution for recovering data from unallocated drives.
3.2.2 Steps to Recover Data Using Stellar Data Recovery
- Download and install Stellar Data Recovery on your computer (avoid installing it on the external drive).
- Launch the software and select the file types you want to recover (e.g., documents, videos, images).
- Select the external hard drive from the list of available drives.
- Click Scan and let the software search for recoverable files.
- Preview the recoverable files and select the ones you want to restore.
- Click Recover and save the recovered files to a safe location (do not save them back to the external hard drive).
Step 4: Create a New Partition Without Losing Data
Once you’ve safely recovered your data, you can proceed to partition and format the drive so it can be used normally again.
4.1 Partition the Drive
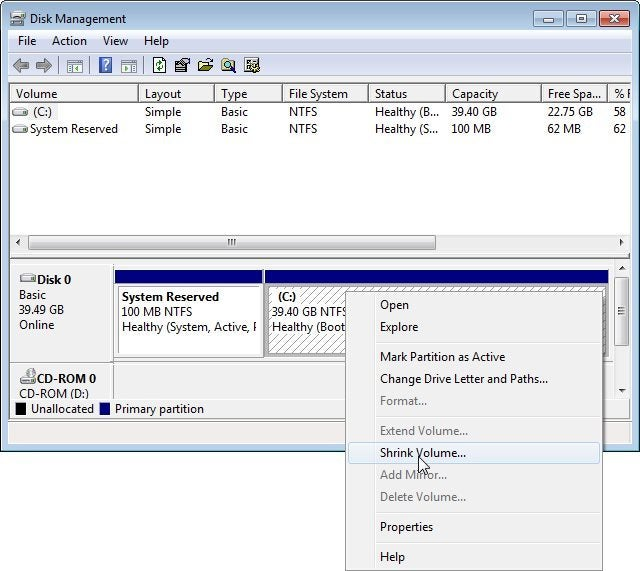
- Open Disk Management again.
- Right-click the unallocated space on your external drive and choose New Simple Volume.
- Follow the on-screen prompts to assign a drive letter and choose a file system (NTFS is recommended for Windows users).
- Click Finish, and Windows will format the partition.
This step prepares the drive for future use.
Step 5: Check the External Drive for Errors
Even after successfully recovering your data and reinitializing the drive, it’s a good idea to check the drive for potential errors that could cause future issues. Here’s how to run a thorough check:
5.1 Using the CHKDSK Command
The CHKDSK (Check Disk) command is a Windows tool that can scan for bad sectors, fix file system errors, and prevent further corruption.
- Press
Win + Xand choose Command Prompt (Admin). - Type the following command and press
Enter:chkdsk E: /f /r /xReplace “E:” with the letter assigned to your external hard drive. - Windows will scan the drive and fix any detected issues.
Step 6: Update Disk Firmware (Optional)
Some hard drive manufacturers release firmware updates to fix bugs and improve drive compatibility. Check the manufacturer’s website for a firmware update if you’re still experiencing issues.
- Visit the manufacturer’s support page (e.g., Seagate, WD, Toshiba).
- Download any available firmware updates for your specific drive model.
- Follow the instructions provided by the manufacturer to apply the update.
Step 7: Perform a Low-Level Format (As a Last Resort)
If none of the previous methods work and your external hard drive is still causing problems, a low-level format may be necessary. This type of format erases all data and rebuilds the structure of the drive. Only do this if you’ve already recovered your data and are ready to start fresh.
7.1 How to Perform a Low-Level Format
- Download a tool like HDD Low Level Format Tool (available for free online).
- Launch the tool and select your external drive from the list.
- Follow the on-screen instructions to perform the low-level format.
- Once complete, go back to Disk Management and create a new partition as outlined in Step 4.
Preventive Measures for Future Data Loss
After you’ve successfully recovered and reinitialized your external hard drive, it’s important to take preventive steps to avoid future data loss:
- Regular Backups: Always keep backups of important data, either on cloud storage or on a secondary external drive.
- Safely Eject the Drive: Always use the Safely Remove Hardware option before unplugging the external drive.
- Avoid Power Surges: Use a power strip with surge protection to prevent sudden electrical spikes from damaging your drive.
- Run Regular Scans: Periodically run CHKDSK or other diagnostic tools to identify and fix any file system errors before they lead to bigger problems.
Conclusion
Dealing with a “Not Initialized” and “Unallocated” external hard drive can be daunting, especially when important data is at stake. However, by following the steps outlined in this guide, you can recover your data and fix the drive without losing any files. Start with basic troubleshooting, update drivers, recover your data using recovery software, and reinitialize the drive. With these strategies, you’ll have a good chance of bringing your external hard drive back to life and preventing future issues.